Pages

Friday, May 28, 2010

"Haley" Baby Sign

This was made for a little girl who likes animals and rainbows. This was so colorful and happy! I love these colors and I love summer!! This sign has texture from the Cuttlebug (Love that machine). You can't tell from the picture but I added Pearl Ex to the green acrylic paint. Turned out sparkly and pretty!


Cute little owl from Sentimentals.


SOLD
Custom orders available

"Alessandria" Baby Sign

This is actually for a little girl who loves Minnie and Mickey mouse! I love how this turned out. The big ears and the bow is my favorite part! I had bought the ribbon and when I got started on this I realized I didn't have a matching pink ink. I ended up having to ink the ribbon I bought to get it to look like the pink ink I used. Phew!!

Minnie...
and...
Mickey!!
SOLD
Custom orders available

"Charlie" Baby Sign & Tutorial

Who is a Cubbies fan??? I know someone who is...Charlie!! I'm a Cubs fan myself so that made making this sign even more fun! The baseball was made using a Ladle and tinfoil....Curious? If you want to know how it was made, Check out the "Baseball Tutorial."

"Cubs Sign" Tutorial
Supplies:


Wood Plaque
Red, White, and Blue acrylic paint
Black embossing powder
Versamark pen
Mod Podge
Pop Dots (Dimensional glue stickers)
Ribbon
Hot Glue Gun
Red and Blue Cardstock
Lyrical Letters Cartridge
Cricut

Step 1: Using painters Tape, I taped around the edges. I painted the outside layer ROYAL BLUE, the middle layer RED, and the face of the plaque WHITE (Takes a couple coats of each).

Step 2: While the paint dries cut out the letters.
The letters for "HARLIE" and the "C "were cut from "Lyrical Letters -JUMBO" and I cut off the ends to create a more "baseballish" look. I had to hand draw my own shadow of the letters (Trace the letters slightly larger).

The "CUBS" & "WIN" were also from "Lyrical Letters -JUMBO" and I left the ends on. Again I hand drew my own shadow.


Step 3: The Cubs home jersey is white with blue lines so with my paper trimmer I cut thin lines and glued them on when the plaque was dry. After the lines dried I cut off the edges.

Step 4:
After you have the letters cut and glued onto the "shadow," glue the "HARLIE" onto the plaque. Let dry.

Step 5: Mod Podge the entire plaque using Mod Podge Glossy.

Step 6: The bat was hand drawn and cut out. With my Versamark pen I drew the lines and added black embossing powder and heat embossed it.

-The "Take Me Out to the Ball Game" was a section from the ribbon that I glued on after the Mod Podge dried on the plaque.


Step 7: While the plaque is drying, Mod Podge the "C," the baseball bat, "CUBS," & "WIN" all separately from the plaque. Once the plaque is dry, adhere the "C" and the bat using the dimensional glue stickers or Pop Dots.


Step 8: For the baseball, you will need to check out the "Baseball Tutorial" to make that.

Step 9: For the black lines next to the baseball I again used my Versamark pen and black embossing powder (I first drew in the lines lightly with pencil after the baseball had been adhered to the plaque).

Step 10: With your glue gun, adhere the ribbon onto the backside of the sign.

Step 11: With your hot glue gun, glue on the "CUBS" and the " WIN" in the middle of where the ribbon is on each side.

Step 12: Sing "Go Cubs, Go! Go Cubs, Go! Hey Chicago, what do you say? The Cubs are gonna win today!" LOL!!

SOLD
Custom orders available

Sunday, May 23, 2010

My 1st Tutorial: Homemade Masks!

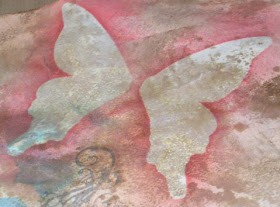
For this tutorial, you will need: A permanent marker, Scissors, acetate (I get my acetate from packages such as the cuttlebug packages), 2 way glue, an ink blending tool, and the image you want to trace. In this case, I used part of a butterfly from Tim Holtz's grungeboard "Plain Elements."

You can use any image either from your cricut, hand-drawn or like me from chipboard or grungeboard. You can get as intricate as you want but just remember you have to cut out the image's tiny pieces (I don't have the deep cut housing for the cricut so I am not sure if the cricut will cut acetate. That would be interesting to know).


Step 1: Place your image on the acetate.
Step 2: Trace the image using your permanent marker.
Step 3: Cut out your image.
Step 4 (Optional): Retrace your image again for a mirror image mask if needed.
Step 5: Use your 2 way glue to cover one side of your image. This will keep your image stationary during the inking process.
Step 6: Wait for the glue to dry. If you do have a mirror image or multiple images to do, you can trace and cut those out while another image is drying. Note: If the glue is still even a tiny bit wet when you use it, it will tear your paper so make sure it is absolutely dry.
Step 7: Place image/images glue side down onto your paper or whichever material you are using. Use your ink blending tool to apply ink all around your image like you would a store bought mask.
Step 8: Once you are done applying the ink/inks, remove your mask/masks and TA DA!! Your image!! My recommendation is to do it somewhat slowly and to not pull them off to quickly.
When you are done using your mask. Wipe off the top and place your image on to either another piece of acetate or sticker paper.

Have fun and I hope this helped you out!!! Have a great day!
Check out my refurbed clipboard to see where my mask butterfly went! =)

Refurb'd Tim Holtz Clipboard

I have a couple of clipboards from college lying around so I decided to spice one of them up. I did a little grunge/graffiti style with this one. I initially just wanted blue, pink and brown. After I started blending, new colors came in and I decided to add some like the orange and purple.

The top picture is of the front and the bottom picture is of the back. I sealed both sides with Mod Podge and then embossed the backside. I soon learned how slippery the Mod Podge can be when trying to emboss. I guess that is how you learn!
Items used: Tim Holtz Distress inks (Worn Lipstick, Broken China, Frayed Burlap, Walnut Stain, Dusty Concord, and Spiced Marmalaid), Tim Holtz Visual Artistry rubber stamps, Mod Podge matte to glue on the paper, Mod Podge gloss, Tim Holtz Masks (Lrg-Flourish and Mini mask-Regal/ Majestueux), a homemade mask out of Tim Holtz Grunge Board, and Zing Chestnut embossing opaque powder.

Saturday, May 8, 2010

Now taking orders!

I have put some items on here for sale. If you scroll through the more recent posts you will find all sorts of things that you can buy. You can also order anything custom. Feel free to browse. If you have any questions, would like more information or want to place an order, contact me at kfawn22@hotmail.com or leave a comment here with your information so that I may get a hold of you. =)

"Emma" Baby Sign

Lots of pretty purples!! This baby sign features fabric flowers, ruffles, gems, and sparkles. This was fun to make!!

"Emma" Baby sign - SOLD

Custom orders are available.


"It's A Boy" Diaper Cake

The tallest diaper cake I have made...so far. Cute little toys that baby can play with.

"It's A Boy" diaper cake - $75.00 + actual shipping cost.
Will self deliver to Chicago suburbs at no cost.

Custom orders are available.


Friday, May 7, 2010

WOO HOO! Fabric Flower Clips!!

Paper clip fabric flowers w/ feathers and gems.

5 paper clips for $4.00 + actual shipping cost (will combine shipping)

Custom orders are available.

I checked out Rhonna Farrer's blog, Rhonna's Designs. She has a great video on how to make these! These are so cool but very time consuming.

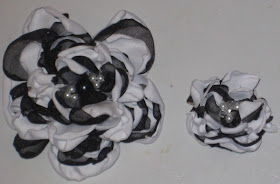
In the middle of all the flowers are Swarovski Crystals. So pretty!! I love how they sparkle! On most of then I added a clip and a pin to the back sides so they can be worn as either a brooch or a clip anywhere. Some of the smaller ones are magnets. So cool what you can do with these!! Thanks Rhonna!! =)

Lrg flowers - $15.00 + actual shipping cost (will combine shipping)
Sml flowers - $7.50 + actual shipping cost (will combine shipping)
Sml flower magnets - $7.00 + actual shipping cost (will combine shipping)

Custom orders are available.

The pink one is a brooch only ($7.50).
The blue is a brooch/clip.
Large flower is a brooch/clip.
Small flower is a magnet.
Large flower is a brooch/clip.
Small flower is a brooch only.
Both flowers are brooches/clips.

Both flowers are brooches/clips.
Large flower is a brooch/clip.
Small flower is a magnet.-SOLD
Both flowers are brooches/clips.
Large flower is a brooch/clip.
Small flower is a magnet.
Both flowers are brooches/clips.