Tuesday, April 19, 2011

Jaida Minnie Mouse Cake Topper

Here is another cake topper I made for a super fun 1st birthday! Pink and Polka Dots. What more can you ask for? Happy 1st Birthday Jaida!!


SOLD
Custom orders available!

Sunday, April 3, 2011

Shell Pink Flower Headband

I recently bought a blouse and I just loved the detail on it. I thought to myself, "I need some hair decor to go with it!" This is what I came up with...
Pin It

  
Pin It

Check out the Double Running Stitch Fabric Flower Tutorial to make the center flower.


Custom orders available!

Double Running Stitch Fabric Flower Tutorial

I love when a sudden idea hits me and then I am able to put it into use. I love all the fabric flowers everyone makes but wanted to come up with one of my very own. I love to do running "stitch & scrunch" flowers but wanted one that had petal shapes too. Here is my tutorial on how to do a double running stitch fabric flower. 
Check out what I made with this fabric flower HERE!

You will need:
Material of your choice
Scissors
2 Needles (both threaded)
Hot Glue Gun

Step 1: Cut a piece of material to your thickness. The thicker = the bigger.

Step 2: Fold the material in half as shown below.

 Step 3: Do a running stitch to attach the open ends but do not scrunch them. Make sure you leave the thread long enough so it does not come undone.

Step 4: Starting about an inch (your preference; could be shorter could be longer depending on length of your material) from the end of your material, make a running stitch vertically.

Step 5: Then, make a continuous running stitch back down the way you came.
 
Step 6: Scrunch the material just like the pic below and tie off your knot.
 Step 7: Work your way down the material until your strip of fabric looks like the pic below.

 Step 8: Form it in a circular fashion until the open ends of the fabric meet. Do the same double running stitch to close the ends, scrunch it and tie off your knot. 

Your flower should look something like the flower below. You can make your petals concave or convex. It is your choice. 
Now your flower is ready to be adorned!!

Monday, March 28, 2011

Tassel Decor Tutorial

Here is how to make a Tassel. 

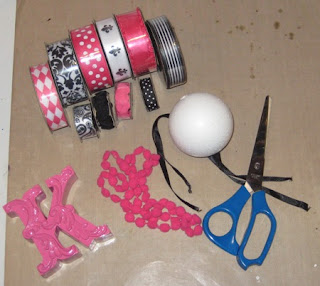
You will need:
Ribbon of your choice
Styrofoam Ball size of your choice (Mine are 2 1/2")
Scissors
Acrylic Paint of your choice
Paint Brush
Hot glue gun/sticks
1 Toothpick
Tulle
Needle & Thread to match your tulle
A topper of your choice
Drill with small bit
Tape measurer or a ruler
Pencil
Painters Tape
Lighter, candle or embossing gun
 

 Step 1: Cut the Styrofoam ball in half.

Step 2: Place tooth pick in center of Styrofoam, on the flat side. Paint the flat side first and then hold toothpick while you paint the top side.

 Step 3: While the paint is drying, cut short, medium & long strips of ribbon. (About 22 strips for each size)

You can cut some or all of the ends to add a little extra style.

Step 4: Start gluing the the ends of the long strips onto the Styrofoam after the paint has dried.
  
Step 5: You will then need to glue the strip down the side of the Styrofoam as shown in the picture below.

Work your way around until all of the long strips have been glued.
  
Step 5: Do the same with the medium sized strips but make sure that you DON'T glue them down the side like you did for the large strips. Just glue the ends.

Step 6: Glue the small sized strips in half and work your way around the top portion of the Styrofoam like in the picture below.

Step 7: Grab a few strips of tulle and sew a running stitch down one side. Gather it so that it looks like the picture below.
.
Step 8: Glue the sides together so that the tulle takes on a circular shape. (The Glue will be covered by your topper).

 Step 9: Glue the tulle to the top.

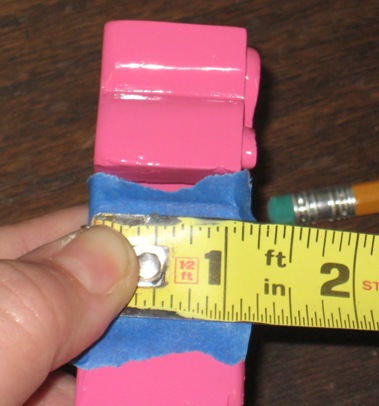
Step 10: Place a piece of painters tape on your topper. Measure the center of your topper and make a dot with a pencil.

 Step 11: Line up your ruler in the other direction with the dot you just made. Make another dot. This dot will be your center point.

 Step 12: Drill a hole at your center point.
  
Step 13: Thread some ribbon through the hole.


Step 14: Place a pencil through the ribbon loops to keep it from pulling through while you even the ends and tie the knots.
  
Step 15: Cut off the ends of the frayed ribbon and singe the ends together with a flame or embossing gun.

Step 16: Glue your topper onto the tulle and...

VIOLA!
Pin It


Your very own Decorative Tassel! 

Let me know if you have any questions. I am happy to help.

Have fun!

Thursday, March 24, 2011

Birthday Hat - My dad's 50th!

Today was my dad's 50th birthday. I am so happy that I was able to spend they day with him and celebrate.  My mom and dad were parents when they needed to be and now they play a different role. They are 2 of my closest friends. They have taught me everything I know and have sacrificed everything for my brother and me. I have my dad's humor, knees, nose, and feet. So many inside jokes. I was never a "daddy, can I have your credit card?" daughter. I was the cuddle up next to him and watch an old movie, begging for bedtime stories about when he was a kid, and a "daddy, I love you" daughter. As I sit here with tears in my eyes, I am so thankful to have him in my life.

Here is the hat I made him for his special day. I knew that no matter what, even if I have to glue it to his head, he was going to wear this hat with a smile. =)
Pin It

There is that smile!!
I love you Daddy! <3

Custom orders available

Tassel Decor

I was browsing through one of my favorite stores the other day. It is one of those stores where you go in with a list and just get completely lost in it. I was inspired by a decorative tassel. I have a very simple rule when I shop/browse in stores like this and it is as follows: If I can make it myself, I won't by it. I stumbled upon this adorable decorative tassel and after looking at it for a moment, I decided I could make this myself! So, I purchased the supplies and went home and made one for my future craft room door. We are getting ready to move in a month and I just can't wait to hang it up!! I will finally have my own craft room!!! WOOHOO!
If you want a decorative tassel made just by you, you can! I will be following up with a tutorial soon so, stay tuned!


Custom orders available